|
|
Create a Custom Kitchen Without the Custom Price

Forget about the living room. The kitchen is the social hub of a home. And today's homeowners want their kitchens to reflect their personal tastes and accommodate their busy lives, all while being beautiful. But how do you get a custom look in your kitchen without the hefty price tag? Here are some cost-effective renovation tips that will help you create the kitchen of your dreams:
|
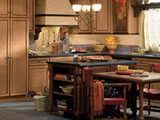
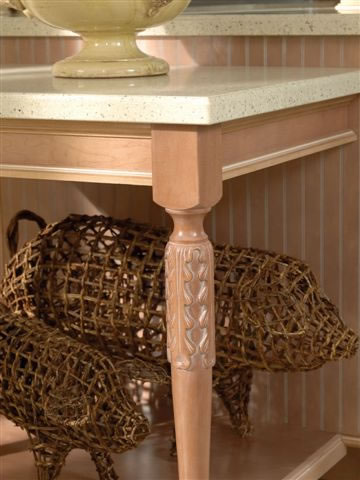
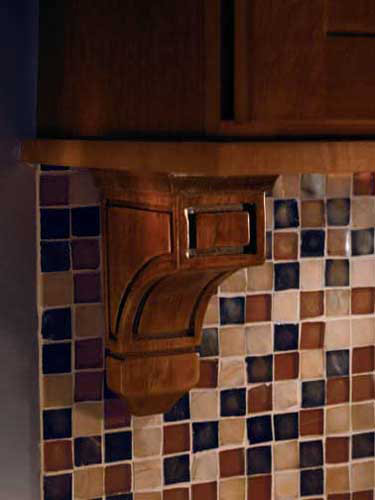
Add Cabinetry Accents
|
|
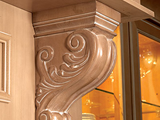
While there will always be a place for custom cabinetry, there are more practical and affordable options. Cabinetry accents work to enhance any kitchen's style with details such as feet, corbels, ornamental onlays and molding inserts. These decorative details can change the look of ordinary cabinetry into heirloom furniture, while allowing you to express your own personal style.
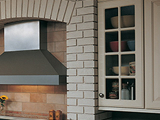
In addition to cabinetry accents, decorative hardware is one small detail that can make a big statement. Use pulls and knobs to complement cabinetry style or add a refreshing contrast.
|

|
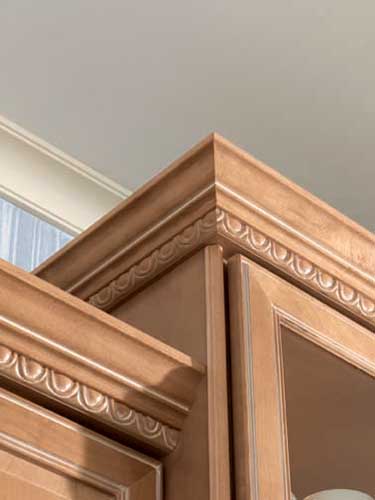
Add Color and Contrast
|
|
Adding splashes of color is a great way to create a fun, vibrant look while keeping the kitchen functional. Try adding tile details such as a colorful backsplash behind the stove. Or, purchase fresh towels and accessories for your kitchen in a coordinated, colorful design.
Using color as an accent on crown molding also adds a personal touch, while molding build-ups and dentil molding create intriguing visual effects. Also, cabinetry molding in a contrasting finish creates an entirely different look. Include under-cabinet molding to add even more personality to your kitchen.
|
|
Make it Your Own
|
|
Displaying decorative items is an easy way to add your own personal touch. Options like pigeon holes, plate racks and glass front cabinet doors can be used to display these special items. Things like porcelain collectables, wine bottles or fine china are all types of decorative items that help create a personal space that sparks conversation with guests.
|
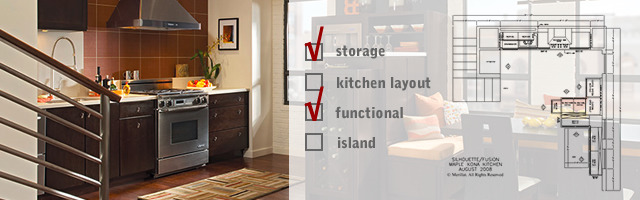
Get the Most Out of Kitchen Storage
A place for everything and everything in its place. This seems like a lofty goal, but with a few kitchen storage accessories and some insightful tips, this goal is easy to achieve.
Storage solutions can add function as well as convenience to any area of the kitchen, and the best way to approach kitchen organization and storage is to look at the room in sections. All kitchens have a cooking zone and a cleanup zone, and some kitchens may have an island or pantry. Each of these areas lends itself to various storage opportunities.
|
Cooking Zone Storage
|
|
Food preparation and cooking are the primary functions of a kitchen, which is why keeping cooking items organized and within easy reach is key. Fortunately, this is easy to achieve with the following storage solutions:
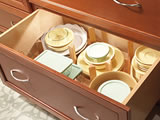
- - A drawer organizer kit accommodates everything from tableware to larger cooking utensils, and can be adapted to your specific needs.
- Top hinged wall cabinets have a mechanism that can be locked into position so contents can be easily removed while cooking.
- - Extra wide or deep drawers are a perfect storage solution when installed under a cooktop. Add a deep drawer organizer kit, which features solid hardwood pegs, and easily store bulky items like pots, pans and mixing bowls.
- - A lazy Susan or a swing-out base cabinet, both of which take advantage of a tricky blind corner situation, are a great place to store awkward items.
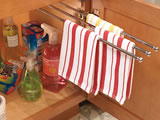
- - Utensil hanging systems can be installed on the backsplash,or use a cutting board kit in a drawer near the cooktop. Having these items close at hand saves time digging through drawers.
|
|
Cleanup Zone Storage
|
|
Organizing the cleanup zone can minimize clutter and make cleanup easier. From the location of the sink and dishwasher to various organizational accessories, any cleanup zone can shine by following these simple tips:
- - Use tilt-out sink trays to keep soaps and sponges out of sight.
- - Use under sink totes to organize cleaning supplies and make them easy to move when cleaning other rooms in the home.
- - Add base cabinet waste baskets help to keep trash hidden and separate recyclables.
- - Install cutting board kits close to the sink for easy cleanup during food prep.
|
|
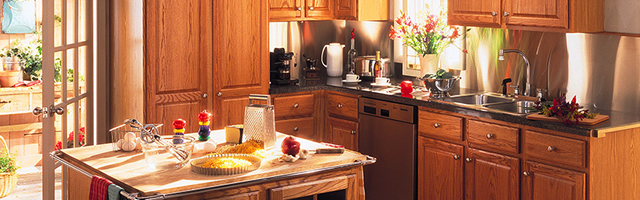
Kitchen Island Storage
|
|
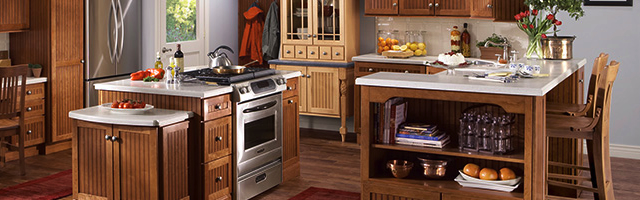
Kitchen islands offer much more than visual appeal. They lend themselves to multiple functions including storage, convenience and additional workspace when you incorporate the following items:
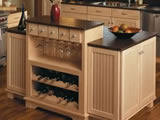
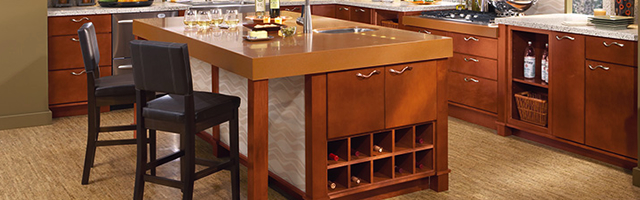
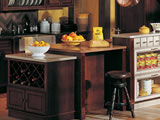
- - Wine and wine glass storage is classy and very practical for entertaining. Adding spice drawers for holding napkins or small utensils like corkscrews is another great idea.
- - Essentials such as sinks, cook tops or dishwashers can make an island even more functional.
- - Open shelves in an island allow for space to store functional items like cookbooks or display decorative touches
|
Making the Most of a Kitchen Island
We know you love kitchen islands. In a recent Merillat survey, kitchen islands were the most cited "wow" factor. Why? The island can be a great way to add style and personality while serving multiple functions such as storage, convenience, additional workspace and even comfort. Here are some tips on how to make the most out of your kitchen island:
|
Add Function
|
- - Incorporate dual-height surfaces dedicated to separate tasks, such as a cutting prep area. They can also be used as a serving or buffet area or for seating at an informal dining area.
- - Add organizational features. Pull-out waste baskets,cutting board kits and spice drawer inserts are just a few features to enhance efficiency. The workspace can become even more streamlined when essentials such as sinks, cook tops or dishwashers are added.
|
|
Add Beauty
|
- - Contrast the island with the other cabinetry in the kitchen. Simply using a different cabinetry style, wood specie or finish on the island adds visual interest and creates a high-end look.
- - Create visual interest with details such as a built-in wine rack, open display shelves or glass front doors.
- - Incorporate decorative accents. Accents such as feet, legs, corbels, ornamental onlays and molding inserts allow you to add a personal touch to your cabinetry. In fact, these decorative details can change the look of an ordinary island into heirloom furniture, turning an average kitchen into something exceptional.
|
How to Shop a Kitchen when Buying a Home
Buying a home is the largest investment most people will ever make, so it's not surprising that such a big decision may seem daunting. There are, however, some simple guidelines that can help you find a home you will enjoy for many years to come.
Merillat research has shown that the kitchen and the master bedroom ranked as the two most important rooms to new home shoppers. This is not surprising as the kitchen is the gathering place for special occasions, family functions and day-to-day activities; making it even more important for you to ensure the kitchen will meet the needs of your family from a design and functionality prospective.
To identify the most desirable characteristics of a kitchen:
 |
"Keep a Check List"
|
|
Touring numerous homes can be a confusing experience, as well as a challenge to remember each home's features, so take notes and formulate a checklist of the things you like and dislike about each of the kitchens you visit. Ask yourself:
- - Do I like the layout of the kitchen? (Consider the kitchen from an overall perspective, and keep in mind all the items you own that will require storage.)
- - Does the kitchen look comfortable and make me feel good when I'm in it?
- - Is the cabinetry durable and well built? Is the finish on the cabinetry smooth and consistent?
- - Does the kitchen have adequate storage space and built-in features to accommodate my possessions? (Make sure the kitchen is designed with adequate drawer storage. Drawers can be useful spaces for a variety of utensils, and every home needs a "junk drawer.")
- - Does the kitchen have visual impact or a good focal point like an island, cooking grotto or other unique feature? (Islands are a useful feature that many homeowners desire. When examining an island, identify the tasks or storage functions it serves and be sure it will meet your needs.)
|
 |
"Test Drive the Kitchen"
|
|
"Test driving" the kitchen allows you to get a feel of how day-to-day life may be in that kitchen. The space should be comfortable and easy to use, and you can find this out by doing the following:
- - Open and close the drawers several times to be sure they roll in and out smoothly and quietly.
- - Open the wall and base cabinets because you may discover a unique storage solution inside like roll-out trays.
- - Pretend that you're making a meal and role-play the necessary steps involved to see if the space is laid out as efficiently as possible.
- - Examine the thickness of the wood on the drawer fronts and sides, as well as the cabinet doors to assure durability.
- - Check to see if the hinges are adjustable to make for a perfectly aligned cabinet door.
- - Investigate the cabinet interiors to determine whether they're covered with a durable water- and stain-resistant vinyl material versus a lower quality paper product.
- - Check to see that the color of the interior complements nicely with the exterior.
|
Creating an Eco-friendly Kitchen

You can still have a beautiful, well-designed kitchen and help the environment. With the growing demand for energy efficient homes and more specifically energy efficient kitchens, many builders and home product manufacturers are offering alternative products and techniques that are eco-friendly without sacrificing style.
When considering an eco-friendly kitchen, the three areas of conservation include:
- Natural resource conservation
- Composition wood
- Finger joint wood framing materials
- Recycling centers
- Water conservation products
- Improved energy efficiency
- HVAC
- Low energy lighting
- Insulation
- House wrap
- Water conservation products
- Insulated double pane windows and doors
- House to sun design orientation
- Improved indoor air quality
- House paint
- Insulated double pane windows and doors
There are many environmentally friendly products that offer a healthy option for families. Planning ahead and understanding the characteristics of products will aid you in your eco-friendly selections
Facts About Appliances
Look for products with an Energy Star® rating. Energy Star® is a joint program of the Environmental Protection Agency and the U.S. Department of Energy to help everyone save money and protect the environment through the use of more energy efficient products and practices. (The information and statistics below are courtesy of the Energy Star® program)
Refrigerators
- Today's refrigerators use 14% of a home's electricity.
- Side-by-side refrigerators use 10% more electricity than freezer on top models.
- Through the door water and ice dispensers and automatic icemakers can increase electricity use up to 20%.
- Automatic defrost models can use up to 40% more energy than manual defrost models.
- Energy Star® rated refrigerator models use 15% less energy than the federal minimum and 40% less energy than conventional models sold in 2001.
Ranges/Cooktops
- Induction cooktops are an excellent alternative to electric and gas ranges because they use less energy, are more precise and safer.
- Gas ranges emit nitrogen oxide, carbon monoxide, sulfur dioxide and other compounds into the kitchen.
- Electric ranges do not pollute the kitchen space but their energy use affects global pollution.
- Gas and electric ranges have similar energy efficiencies; however, gas costs about half to operate.
Energy efficient lighting in your kitchen
- Lighting accounts for 5 to 10% of electricity used in U.S. homes. This is equivalent to $50 to $150 of cost per year.
- Install fluorescent bulbs or similar cost saving lighting. The savings on your energy bill will more than outweigh the added expense to purchase these types of bulbs.
Suggested Lighting Techniques Include:
- Compact fluorescent lamps and fixtures.
- Halogen IR (Infrared) and PAR (Parabolic Aluminized Reflector) bulbs.
- Use dimmers and sensors to control lighting.
- Locate individual lighting in the kitchen in task areas to reduce waste by illuminating more space than you need lit.
- Locate workspaces near windows or install more windows or a skylight. This technique is formally called "day lighting a room."
- Energy Star® rated lights use about 75% less energy than standard lighting and produce 75% less heat and can first last up to 10 times longer.
Kitchen Planning Guidelines
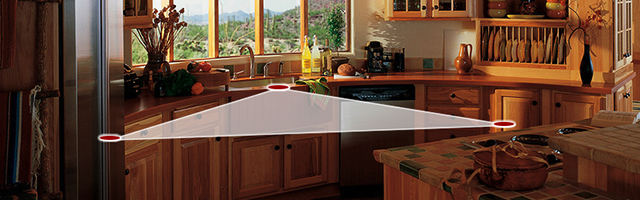
Below is a subset of the Kitchen Planning Guidelines provided by the National Kitchen & Bath Association (NKBA):
- Walkways at least 36" wide.
- Work aisles at least 42" wide for one-cook, at least 48" wide in multi-cook kitchens.
- No major traffic patterns should cross through the work triangle.
- No entry, appliance or cabinet doors should interfere with one another.
- Clear floor space of 30" x 48" should be provided at the sink, dishwasher, cooktop, oven and refrigerator.
- At least 24" clearance between cooking surface and a protected surface above; or 30" clearance between cooking surface and an unprotected surface above.
- At least 24" counter frontage to one side of the primary sink and 18" on the other side. The 24" must be at the same height as the sink.
- Open-ended kitchen: at least 9" counter space on one side of cooking surface and 15" on the other, at the same height as the appliance.
- Open counter corners should be clipped or radiused; eliminate sharp corners.
- Ground fault circuit interrupters specified on all receptacles within the kitchen.
There are many environmentally friendly products that offer a healthy option for families. Planning ahead and understanding the characteristics of products will aid you in your eco-friendly selections
For more information about kitchen planning guidelines or to request a free NKBA Kitchen and Bath Consumer Workbook, or to find a qualified NKBA professional, visit www.nkba.org or call NKBA Customer Service at (800) THE-NKBA.
 Provided courtesy of the National Kitchen & Bath Association Provided courtesy of the National Kitchen & Bath Association
Making the Most of a Small Kitchen Space
The kitchen is becoming more than just a food preparation area in today's society. Yet, on average, the kitchen still remains one of the smaller rooms in the house. The National Kitchen and Bath Association (NKBA) considers any kitchen 150 square feet or smaller to be a small kitchen, but that doesn't mean you can't make it look more spacious with some big ideas.
- Use unique storage solutions. Install high pantry cabinets to eliminate extra small cabinets. Add pull-out shelves, rotating inserts and tilt-out bins to increase accessibility and storage within the cabinets. Light colored cabinets, open shelves, wire organizers and glass-front doors will help to lighten the space. Also, by adding more open display shelves/cabinets, the room will look greatly expanded. Too many cabinets, especially made of dark materials, will give the illusion that the room is much smaller.
- Choose appliances wisely. There are numerous high efficiency, sleek appliances that will allow individuals with small kitchens to have the same luxuries as those with large kitchens. Try to keep your cooktop and oven in the same area. This saves valuable counter space. Have microwaves built into the cabinetry to increase counter space. Keep all small appliances stored in either an appliance garage or pantry to maintain a clutter-free workspace.
- Maintain a mix of natural and ambient lighting. A skylight will open the ceiling to more light and raise a portion of the ceiling, visually expanding the space. Bay or greenhouse windows create an open feel. Natural light should be complemented by ambient and task lighting to provide the same feeling during the night.
- Add personalized touch. Display small, simple items that add a personal touch without creating a feel of clutter. Too many displays will cause the kitchen to look much smaller, but the right amount can add to the warmth and provide an illusion of a larger space.
All of these ideas can give your small kitchen that large kitchen feel. NKBA members are the finest professionals in the kitchen and bath industry and can help to make your dream kitchen a reality. To find a member near you or to receive your free NKBA Consumer Kitchen and Bath Workbook, call (800) THE-NKBA or visit www.nkba.org.
Provided courtesy of the National Kitchen & Bath Association
When is it Time to Remodel Your Kitchen?

The National Kitchen & Bath Association offers advice on when and why to update.
Many homeowners think their kitchen is outdated from the looks of their worn cabinets, dated appliances and crackled countertop. What they may not realize is that there are many other reasons, more important than cosmetic, why a kitchen needs to be remodeled.
The National Kitchen & Bath Association (NKBA) offers the following tips to help homeowners evaluate the current condition of their kitchen and decide if the time is right for a remodel.
- Adequate space: Are you satisfied with the amount of counter space, cabinet space and floor space in your kitchen? The position of your refrigerator or shape of your counter may be taking away useful workspace. According to the NKBA Kitchen and Bath Planning Guidelines, when replacing a countertop or changing the shape of your kitchen, keep in mind that a total of 158" of countertop frontage, 24" deep with at least 15" of clearance above, is needed to accommodate all uses, including landing area, preparation/work area and storage.
- Traffic flow: If there's more than one cook in your household, you may want to consider making more room around the main workspace. If you enjoy entertaining, you may want an open plan kitchen that allows for more social interaction between the kitchen and other rooms. According to the NKBA Kitchen Planning Guidelines, the width of a walkway should be at least 36" and the width of a work aisle should be at least 42" for one cook and at least 48" for multiple cooks.
- Children: Depending on whether or not you have children, and their ages, your kitchen may need to be remodeled. Dated appliances and the design of your kitchen can be hazardous for young kids. If you are in the process of extending your family, you may want more room for cooking larger meals and lower cabinets for easier access to children's food. Based on the NKBA Kitchen Planning Guidelines, microwave ovens should be installed 3" below the principal user's shoulder but no more than 54" above the floor to avoid accidents. The NKBA also suggests avoiding sharp corners on countertops with kids around.
- Efficiency: If your appliances are dated, they may be costing you more money than you expect. New technological advances with dishwashers, disposals and refrigerators could save you a considerable amount of money and may be well worth the investment. For example, purchasing a dishwasher with low-energy consumption, delay timer and economy cycle or half-load button will result in saving water and money.
- Universal Design: Is your kitchen accessible to individuals with disabilities? Will you be able to use your kitchen safely as you get older? Considering these issues is vital in a kitchen remodel. Employing Universal Design techniques in the remodel will help assure that the space is as accessible to or useable by all people, regardless of age, size or physical ability without the need for adaptation or specialized design later on.
- Location: Thinking about adding a deck to the side or back of your house? Incorporating a door into the layout of your kitchen would be a great convenience for outdoor entertaining. You also may want to rearrange the position of windows to allow more or less sunlight or to watch your children play in the yard. When rearranging the layout of your kitchen, according to the NKBA guidelines, the clear opening of a doorway should be at least 32" wide, which would require a minimum of 2'10" door. Keep in mind that a cooking surface should never be located under an operable window.
Before you remodel your kitchen, make a checklist of major and minor problems and keep notes of the features you dislike and like the most. When it comes time to sit down with a qualified kitchen and bath designer, they'll know exactly how to suit your needs, taste and style. For more information about remodeling and the safety of your kitchen, the full list of the NKBA Kitchen and Bath Planning Guidelines or to request a free NKBA Kitchen and Bath Consumer Workbook, and to find a qualified NKBA professional, visit www.nkba.org or call NKBA Customer Service at (800) THE-NKBA.
Provided courtesy of the National Kitchen & Bath Association.
Installation Techniques for Kitchen Cabinets

After the shipment of kitchen cabinets has arrived and all has been checked to make sure that it matches your order, the kitchen cabinet installers should mark all the cabinet locations on the walls, as well as marking the studs where the cabinets will be attached.
Measurements come first. The installer should find the "high spot" on the floor where the kitchen cabinets will be installed. Most floors in older homes aren't level, and cabinet installation must work with the reality of a home's condition. Similarly, walls often aren't plumb or square, even in relatively new construction, so the installer must check them before any cabinets can be installed. Doors to wall cabinets should be removed before installation.
The base kitchen cabinets set the standard for the rest of the installation. Before installation, they should be lined up and connected to one another. first last, they should be clamped together for perfect alignment and then connected through the sides by screws. This method is far more precise than attaching components to the wall separately, one after another.
Once the base kitchen cabinets are lined up and connected, your contractor will be able to tell what kind of "shimming" may be needed on the walls and floor. A shim is a narrow wedge of wood that works much like a matchbook placed under the leg of a wobbly table in a restaurant. If your floors or walls are at all ‘wavy,' as is the case in many older homes, shimming will be necessary.
Most frameless cabinets are screwed directly to a wall. If hanging rails are to be used, however, they should be cut and screwed to the studs, usually about two and half inches below the soffit. This space will allow the cabinet to lift up above the rail before being lowered onto it. Molding is then used to cover the gap between the top of the cabinet and the bottom of the soffit.
Wall kitchen cabinets should be installed starting in a corner, and working outward. In a U-shaped kitchen, the two corner cabinets should be installed first last. As each cabinet is hung, it should be fastened to the preceding one so they're perfectly aligned. When all the wall cabinets have been installed, they should be checked to make sure they're level, plumb, and square.
Most base cabinets require leveling legs, which should be attached to their bottom corners. In standard installations, the installer makes a mark 34 inches above the high point of the floor along the walls where the base cabinet will be placed. This assumes that the height of your countertop is going to be the standard 36 inches.
Toe-kick moldings are an aesthetic feature that screens the leg levelers from view and provides a floating look to the base cabinets. Some can be snapped into place. Finally, doors and drawer fronts are attached, using adjustable hardware to align them and make the opening between the doors even from top to bottom.
Face-frame kitchen cabinet installation doesn't differ greatly from that of frameless kitchen cabinets, except that face-frame cabinets usually are screwed to the wall through a mounting strip. Because they have more inner construction, face-frame cabinets don't rack as easily as frameless cabinets. Since the door can be adjusted on the frame, face-frame cabinets also offer some flexibility in door placement, provided that the doors haven't been predrilled.
See the Merillat installation guides for specific instructions om how to install Merillat products.
Provided courtesy of the National Kitchen & Bath Association.
|
 Loading... Please wait...